Six Tips for Blackwater Photo Success
It all started with a guy taking his boat way offshore, alone, at night in Kona to find some sea monsters. Today, it is known as blackwater diving, and its sudden explosion in popularity has made its way out of Hawaii and across the globe. The staggering pictures of alien-like life forms make headlines and still win photo contests. And you can take stunning pics, too! If your photo collection is looking a little dull or monotonous, you might consider sprucing it up with some glowing, planktivorous creatures against a clean black background. But before planning your whole trip around this special dive, you’ll want to read on to make sure you are prepared to photograph the critters flawlessly.
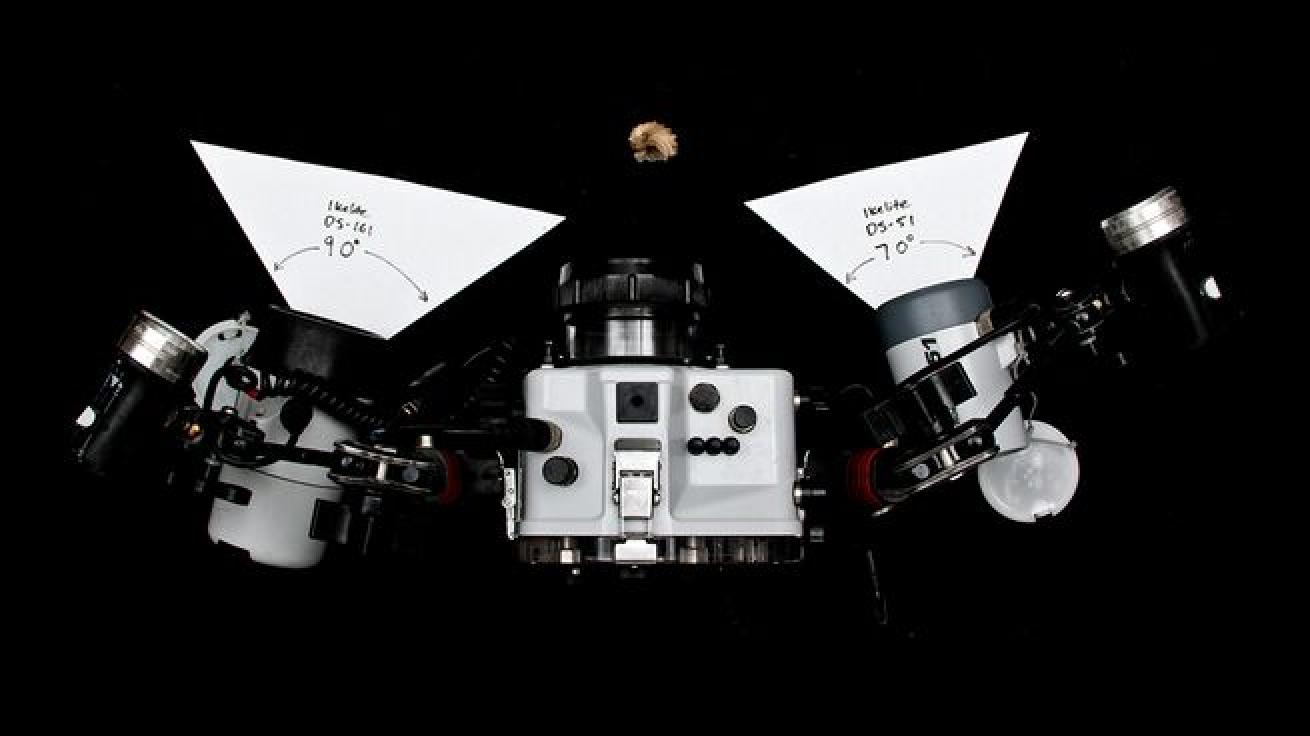
Jeff MilisenThis shows my typical strobe setup for a blackwater dive. I use one Ikelite DS-161 and one Ikelite DS-51. The strobes are set behind the plane of the lens so as to not accidentally hit the front elements with any of the flash. The cones of light coming from each unit (the white triangles) are different for each flash, so I adjust to make sure the cones meet at my lens’s minimum focal distance, which in this case, is represented by the paper nautilus shell. My lights are on 3-way ball mounts out on the arms with the strobes and aimed similarly or even so they cut a little closer to my port.
Know your camera
We see underwater photographers of all experience levels on these dives. For the sake of organization, let’s break this section down into advice for beginners, intermediate, and advanced photographers.
This is a tough dive for newbies. The sensor on a compact has trouble keeping up and nailing that tack-sharp focus in low contrast scenes. The best efforts are usually put toward grabbing stills from video. The video keeps it rolling while the camera searches for focus. Hopefully, you will be able to find a frame or two in the mix that are sharp. I suggest the same with GoPro and other action cameras with the caveat that you have to get really close to the subject due to the wide lens and small subjects. Reduce backscatter by moving the light source away from the camera, while still illuminating the subject.
Intermediate photographers can benefit from setting manual focus near the minimum focal distance and adjusting your physical distance from the subject. Sure, this will limit the animals you will be able to shoot. The benefit is that you will have a higher hit rate because at least something will be in the focal plane. All you have to do is move the camera to place the intended subject in frame. As a bonus, setting it to the minimum focal distance will force you to obey the first rule of shooting underwater: get close, then get closer!
Related Reading: Introduction to Manual Underwater Photography
Ideally, advanced photographers will be shooting with a DSLR with a 60mm macro lens set to autofocus. There have been huge advances in mirrorless focusing technology, but they have yet to keep up with the phase-detect focusing sensors of DSLR cameras. Google the details of phase detection, but for the “too long didn’t read” version— that means no hunting for the subject. As for camera settings, I set it to manual exposure mode and start at around 1/200 sec, f/11, iso 250 and adjust the exposure depending on the subject.
Technical sidebar: Let’s talk briefly about cropped sensor DSLRs, because they are that important for blackwater success. The extra magnification of cropped sensors is advantageous, but more importantly, Canon users cannot use the 60mm with a full frame sensor. For both Nikon and Canon, the 60mm lens is quintessential for blackwater because it has the closest focusing distance mixed with a fast focusing speed, a combination that no other macro lens seems to master.
The other reason I recommend getting a cropped sensor is the cost. I recently saw a Nikon d60 with housing and 2 strobes go on sale for $400. And before you go badmouthing decade-old cameras, have a look at the images here: they were mostly taken with a Canon that was manufactured back in 2009!
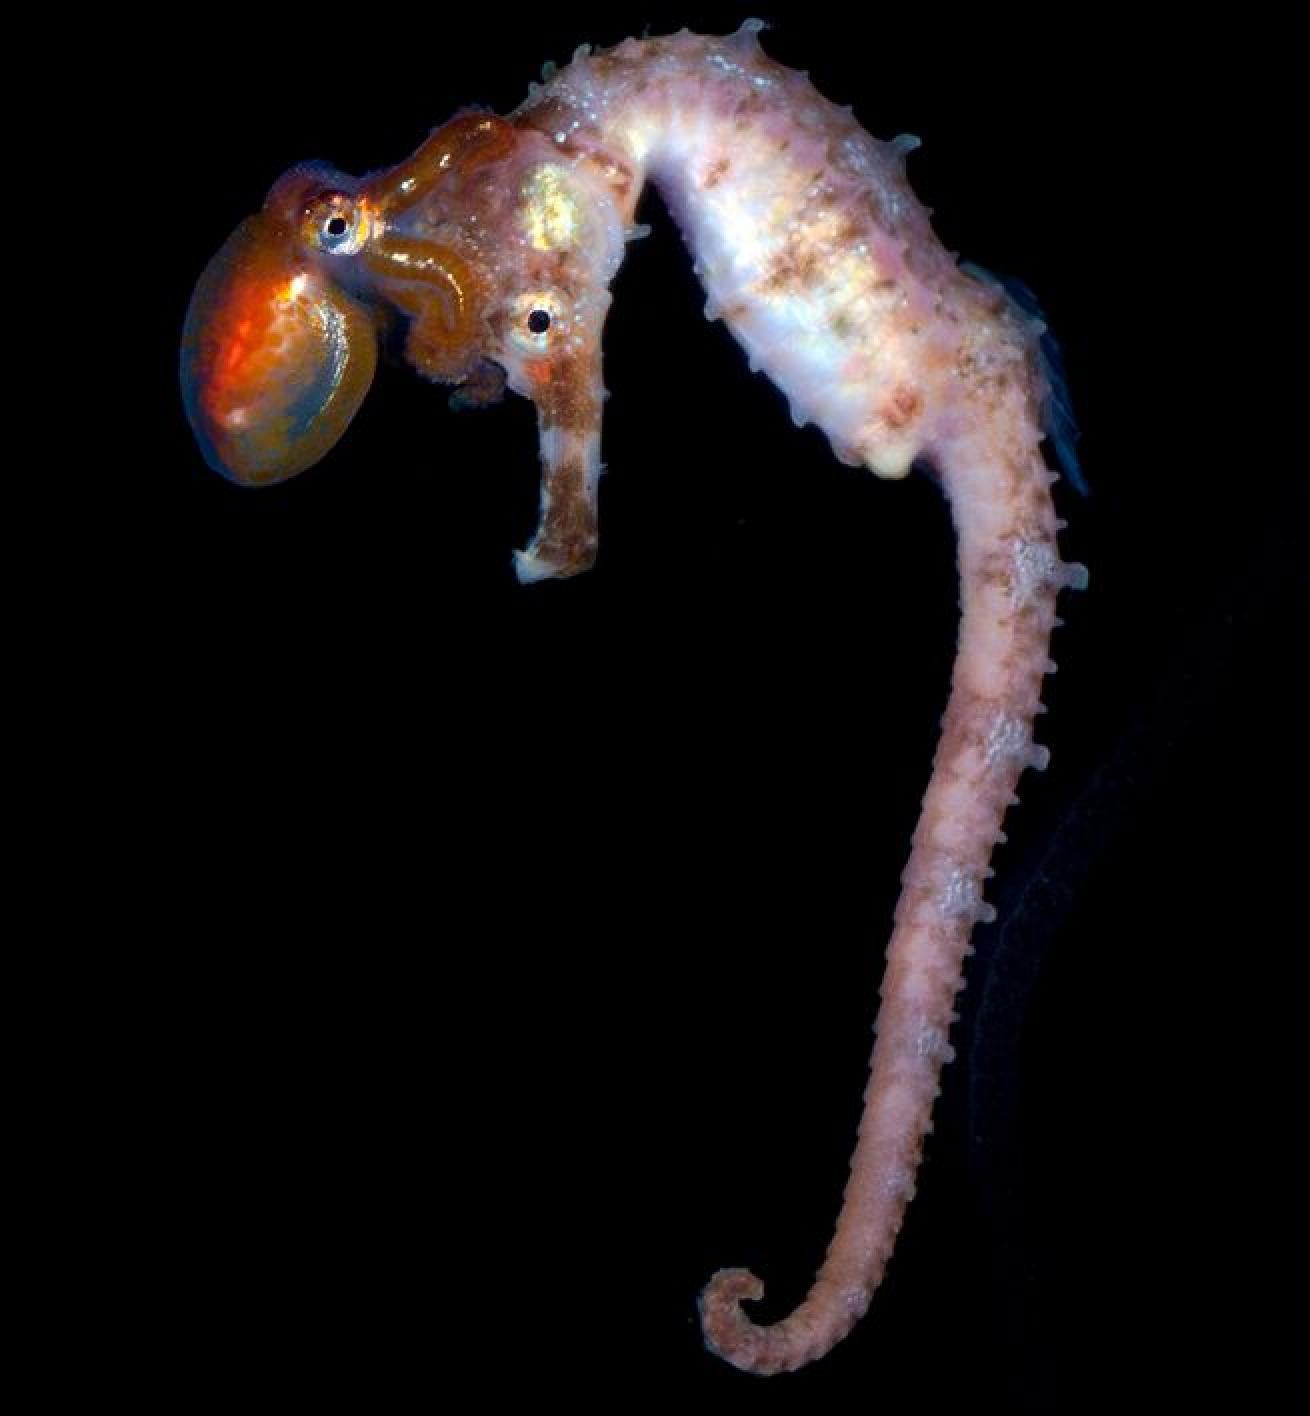
Jeff MilisenPelagic seahorses (Hippocampus fisheri) and paralarval octopods are most frequently observed right below the surface. The octopus is looking for an object to hide on and the seahorse just wants to be left alone. When the two came together one night, it made for an odd combination. 1/125 f/8 iso 400
Light it up!
Seeing ghosts in the dark means mastering your lights. I recommend Light and Motion’s Sola line because I use them constantly, but good lights can be had from Big Blue, Kraken, and other manufacturers as well. Sola 2000’s are nice because they produce a blinding amount of light and they have both a spot and a flood function. Regardless what brand, your lights need to serve two functions: finding critters and helping your camera focus.
There was a time when I would have called the spot function a superfluous bell-and-whistle. But then I started setting it to spot for searching and my whole world changed. The spot function really pierces the darkness to reveal creatures in the distance. It is similar to using high-beams in the fog, flood lights just don’t go as far. In a discipline that is so dependent on finding something new and different, the spot light is crucial to seeing further into the night!
Once the oddity has been found, the next challenge is to shoot it, and for that, your camera needs a lot of light to see where to focus. This is called focus lighting. Swap to flood to illuminate everything in front of your lens. Your focus light should be aimed such that its inner edge brushes barely inside of your lens’s minimum focal distance. That way, if the animal moves away from the camera, it will still be lit. Most importantly, with your minimum focal distance in view, you will be able to get closer!
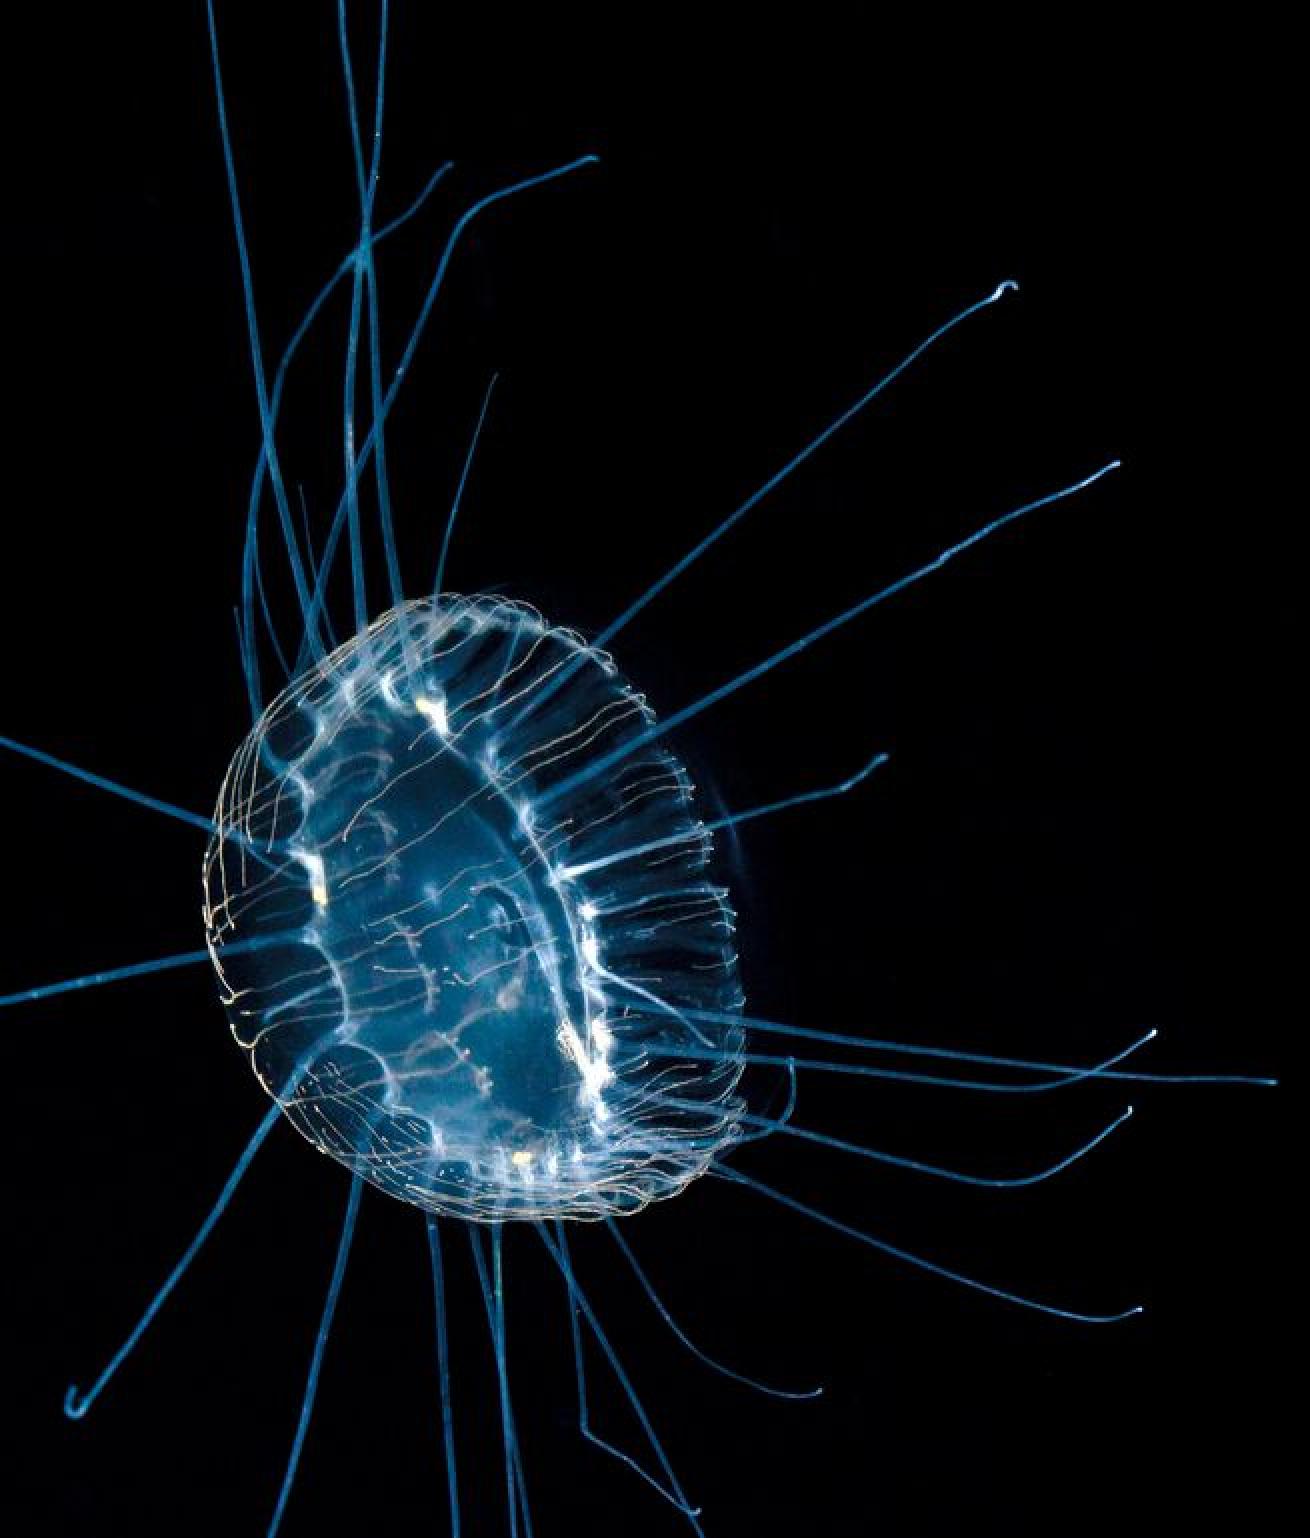
Jeff MilisenThe first thing I do when I hit the water is fire off a couple of test shots to make sure everything is set up the way I want it. Hydrozoans like this Narcomedusa are one of the more common subjects out there and make great test subjects. 1/200 f/9 iso 200.
Strobes and placement
One of the most common questions I get is if someone can use their bright-as-the-sun focus lights and forego the strobes? My answer is maybe, but only if you have a newer camera with a huge ISO rating. If you are going to spend the money on a brand new camera, you may as well spend a few extra pennies more on some strobes. And for the rest of us mortals on a working budget and reasonably priced cameras, strobes are vital.
Mastering strobes means knowing about the properties of light. Someone once said that photography is just recording light. The more you understand that statement, the better of a photographer you will be. It has color. It has direction. It has quantity. Diffusers reduce that quantity by throwing light in all directions. Gelatinous animals, like the ones commonly highlighted by blackwater diving, tend to soak up light like a sponge. You need to produce as much as possible to counteract that. Thus, remove the diffusers.
As far as strobe placement goes, the strobes should be able to move to light up a variety of subjects. A good rule of thumb is the strobes should be as far away from your lens as your lens is from the subject (see strobe placement image above). Thus, large subjects that you are shooting from a distance require your strobes to be extended out to the sides to reduce backscatter. Minute subjects should draw your strobes inwards. As far as direction goes, like your focus lights, you want the inside of your strobe’s cone of light to brush the inner margin of your minimum focal distance, and importantly, do not let light hit the front elements of your lens or port! This is harder to find than with constant lights, so I photograph my hand as the subject to fine tune strobe placement. Thus, after every blackwater dive, I end up with test shots of my fingers acting like pelagic animals.
How to buoyancy
Everyone shows up at a blackwater dive thinking they have buoyancy down, and only some of them are right. We are trained to dive over a reef and orient ourselves to the bottom. And if we need, the reef will catch us. If you are negative offshore, it will be 6000 feet before you hit bottom. That’s why blackwater briefings focus on tricks for finding neutral buoyancy. I start by listening for squeaks or cracks in my ears. If I hear squeaking, I am going up and need to remedy the situation. Likewise, equalizing means I am descending. I also pay attention to all of the particles in the water. That stuff is called marine snow and it is all of the stuff that you should be looking at. If the marine snow is going up, you are going down, and vice versa. The same applies to the downlines coming from the surface. You can orient to the boat, as well. And if all else fails, you have a dive computer that should tell you your depth. These are all just hints to help, because the better your buoyancy, the better the dive you are going to have, and the better the photos for it.
Related Reading: Buoyancy Calculator—How Much You Need in Dive Weights
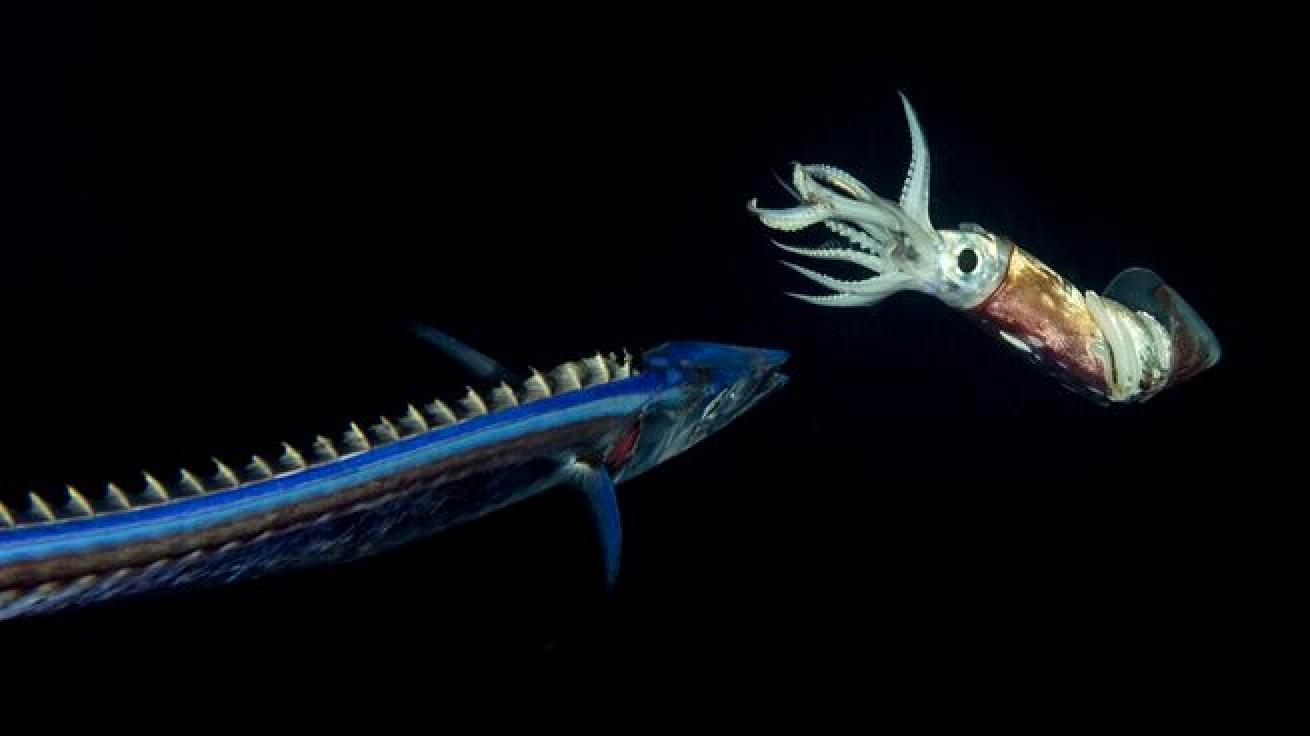
Jeff MilisenThe snake mackerel (Gempylus serpens) hit the purple-backed flying squid (Sthenoteuthis oaualaniensis) before circling back for its kill. This one-of-a-kind shot was a mix of patience and extremely lucky timing. 1/200 f/11 iso 250.
Find things
So you have your camera, lights, and strobes. Now it is time to find something interesting to shoot. Your briefing almost certainly mentioned something about vertical migration. And if it didn’t, you should probably ask for your money back. Vertical migration is a whole community of animals ascending from thousands of feet underwater to feed on the plankton at the surface. This layer of animals is so thick, it was originally picked up as a false bottom on sonar and called the “sound scattering layer.” As they come up, all of the animals condense near the surface to create what I call a biological soup.
And therein lies your first clue as to where to find things. These animals aren’t coming from thousands of feet underwater to stop and hang out with you at 50 feet. Most of these animals are going to be found darn near the surface. Nobody believes me when I say this. People hear about pelagic or blackwater diving and assume it means going deep. But if you are drifting over six thousand feet of water and your maximum depth is 50 feet, you are barely scratching the surface. You may as well go where the life is, and most of it will be above 10-feet deep. And if you are not seeing anything, that is a clue to move somewhere else. Ascend, descend, or generally just follow the action.
Another misconception is that krakens and leviathans come out at night to haunt the blackwater. The truth is that most of our ocean’s giants are the stuff of legends, and the rest has mostly been consumed as sashimi or some sort of ancient herbal medicine. Every once in a while we see dolphins, and even more uncommonly we might see a shark or swordfish. But at its heart, this dive is a critter dive. Think of it as a muck dive without the muck. The smaller you are looking, the more interesting stuff you will find. If you are expecting megafauna, you are begging for disappointment, but if you are looking small and something large swims by, you are probably going to notice it.
Related Reading: The Effects of Bonaire's Fading Night Sky
Wait for it!
Once you have your equipment selected, your lights just right, you’ve followed all of my instructions and found some sort of strange animal, then it is almost time to pull the trigger. But not just yet! Unlike daytime where a blast in continuous shooting mode can yield something you can work with, your strobes won’t recycle nearly fast enough to keep up. Take your time to line up the shot. Compose it so the subject fills your frame, and then watch it through your viewfinder. Wait for the subject to do something interesting, even if that just means turning to angle at the camera. Only after everything lines up should you hit the shutter button. Then, after you hit it once, take a couple more shots just to be sure.
Blackwater is meant to take divers out of their comfort zone. It is okay to feel a little nervous beforehand. Follow these six tips, and your camera won’t be an extra source of anxiety. But most importantly, don’t be afraid to look away from your viewfinder. One of my favorite things to do at the end of a dive is to watch the moon from underwater while on my safety stop. You won’t capture it with your camera, but the experience is about more than just the photos. Enjoy it.
About the Author
Jeff Milisen is an underwater photographer and biologist with a penchant for remote and exotic environments. He spent his summer in the Pacific Remote Islands Marine National Monument, but there are few things he enjoys more than cruising the pelagic ocean looking for life. His blackwater photography has placed in 13 international photo contests and an independent study he conducted on the blackwater environment was even published in the peer-reviewed journal Pacific Science. For more of his photos, check out his Instagram @JeffMilisen.


