The Big Picture
November 2006
Text and Photography by Stephen Frink
I recently had an assignment to create some very large murals, images for the new Florida Keys National Marine Sanctuary Visitor Center. In the initial e-mails with the designer, I was told they require 650MB files. Clearly this was a typo, I assumed. I shoot a Canon EOS-1Ds MKII, the reigning champion in the megapixel race (at least for cameras that can be used underwater, and therefore not counting medium-format cameras with digital backs or 4x5 film cameras), and this camera can hit the 65MB size with only slight interpolating (the normal file processed to eight-bit TIFF from RAW is around 49MB). But 10 times that? 650MB? No way!
Yet, that is truly what the designer meant. These murals were to be enlarged to 16 feet wide, and the traffic flow at the exhibit meant that visitors could walk right up to the prints. This was not like a billboard, which has to be only sharp enough to view from 500 yards away at 60 miles per hour. These murals had to be sharp enough to look good three feet away. Quite a challenge for our existing technology.
Before the project could go forward, I had to submit a digital file for a sample enlargement. Amazingly, the clients were quite happy. It seems their photographers for similar projects had been submitting medium- and large-format slides, and the fact that these digital files were competitive in terms of quality speaks volumes about the potential of digital capture vs. scanned film. But it also suggested that I had to get the absolute best quality from my digital images.
The whole project became an interesting exercise for me, as too often I find myself rushing through a dive from subject to subject, blissfully blasting away, knowing that I can always delete later. Or better yet, "fix it in post." Given the power of Photoshop software, too many marginal images are clogging my hard drives, as I think that one of these days I'll go back and make something of them. Why not do everything possible to get it right the first time? For this project, I had no choice.
Rule 1
Exposure Rules, Histograms Rock
While digital photography is fairly forgiving in terms of exposure, significant overexposure means that the detail is gone and nothing will bring it back. As a result, many shooters err on the side of underexposure. Fortunately, we have a very easy way to evaluate an image immediately after it is taken, simply by examining the histogram on the camera's LCD screen. Ideally arrayed as a Gaussian curve, too many pixels spilling off to the right probably means overexposure, and heavy distribution of data on the far left may mean underexposure. Yet, underexposure can be a massive issue as well, for significant and uncorrectable digital noise can result.
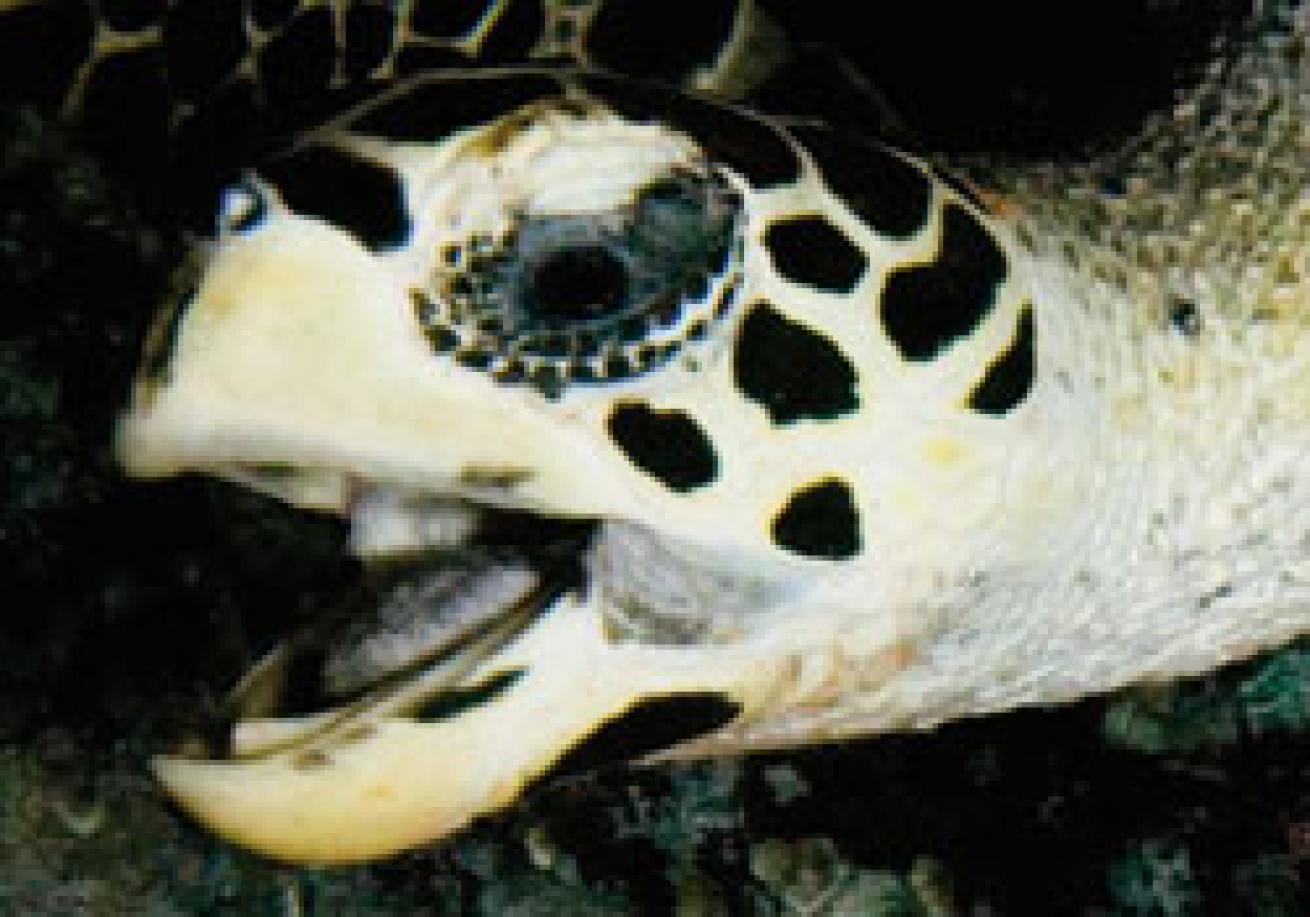
Here's an example. I was diving the Town Pier in Bonaire and saw a cooperative turtle make a quick fly-by of the orange cup corals cloaking the pilings. Recognizing this as a significant photo-op, I shot as quickly as my strobes would fire, capturing one of my favorite images.
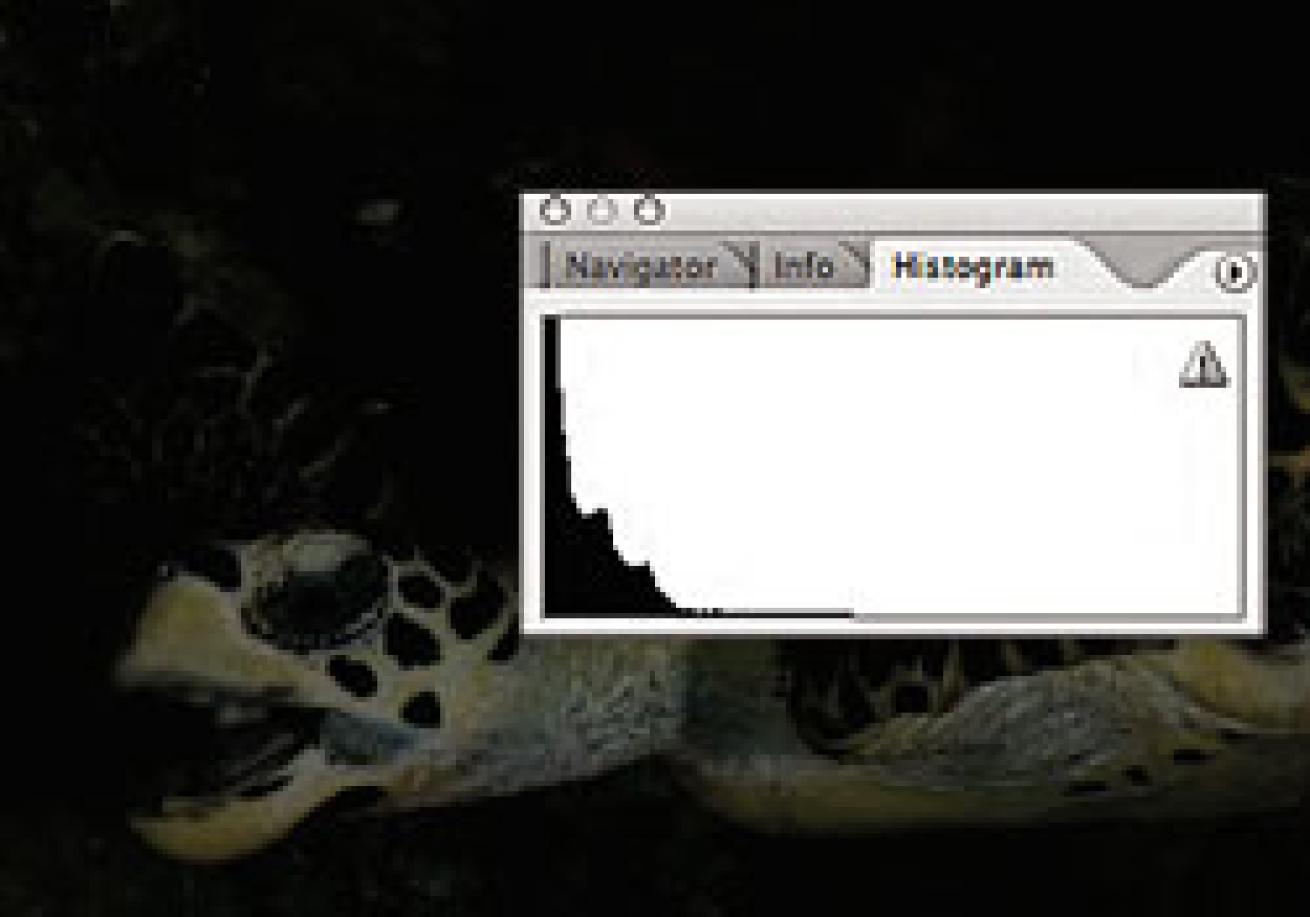
Yet there were others from the series that suffered from underexposure because I was shooting before my strobe recycled in an effort to capture a specific composition. I liked the posture and expression of the turtle in the underexposed shot, but look at the histogram (image #3) as revealed in the Photoshop RAW template. All the data is skewed far to the left, indicating significant underexposure. Could I fix it in Photoshop? Maybe.
After adjustments, the histogram looked better and the subject was more dynamic. For a small print, say 11x14, or display on the web, I'd say salvation was achieved. But, for a 16-foot mural, massive noise and other digital artifacts would be obvious. Look at the detail, or lack thereof, at the Actual Pixels (100%) view (image #2).
Far greater quality could be extracted from the image with the better distribution of pixels across the histogram. So, Rule No. 1: Get the data, all the data, on the card to begin with.
Rule 2
Do Everything Possible While In RAW
Of course this assumes your digital images are being captured in RAW to begin with, but the advantages to this workflow protocol are so apparent it almost doesn't bear mentioning. It records all the data from the camera's computer, without the in-camera compression that happens with JPG, and once the Photoshop Camera RAW dialog box opens, massive controls are available to the shooter.
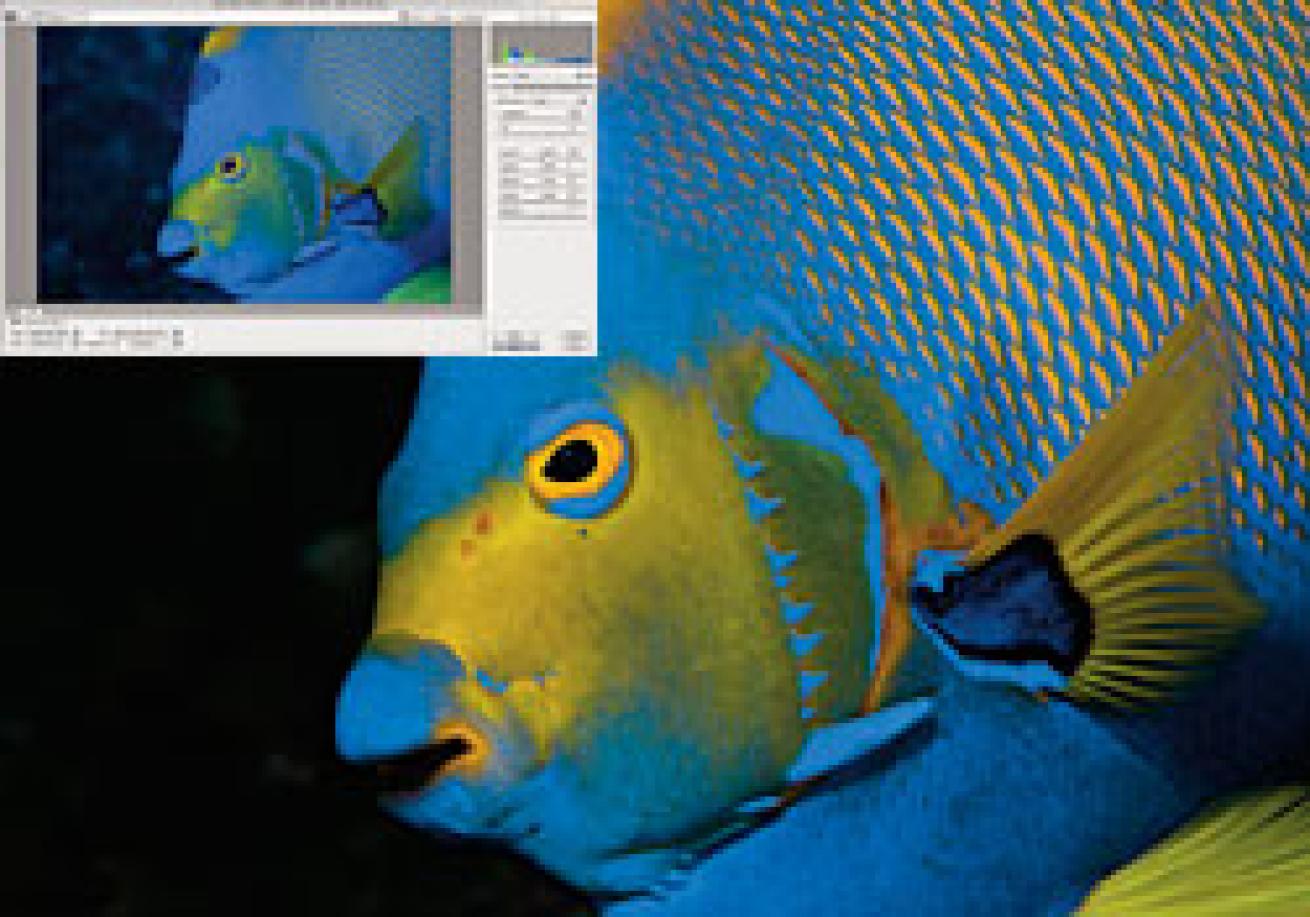
On the next page is an image that would have been very problematic if I had not captured it in RAW. I had been shooting some interiors the day before, and set my camera's white balance to "fluorescent," which made for some pretty funky colors when I shot this queen angelfish with the same 3,000-degree Kelvin white-balance setting.
With just a couple of slider controls I changed the white balance setting to 5,100 degrees Kelvin (custom daylight) and filled in some of the shadows.
All of which made for very easy final tweaks to the final image once I did open it in Photoshop. Some simple levels adjustments, a little color balance correction, and then all that remained was some healing-brush work for small bits of backscatter. Not only was it much easier and quicker doing all the heavy-lifting in the RAW format, the corrections I made were essentially those that would have been done if the camera was set for the correct white balance to begin with. That power is just too meaningful to ignore.
Rule 3
Work in 16-bit, Save to 8-bit
While the whole theory of bit depth is beyond my space allotment (not to mention my knowledge), the RAW protocol box offers the option of opening an image in 16-bit or 8-bit. Always open in 16-bit. That allows all the data there is to be used in whatever adjustments need to be accomplished. Once all corrections are done in 16-bit, there is very little advantage to saving at that bit depth. The file is twice as big as an 8-bit file, occupying twice as much space in an archive, for no significant enhancement. My mantra: Work in 16, save to 8.
Rule 4
Light Right
This mural project taught me another lesson--slow down and pay attention to strobe placement. The first image the clients selected, which had visible backscatter, taught me that lesson. After I spent an hour cloning white spots that would be the size of softballs in a 16-foot enlargement, it occurred to me that I should be ultra-careful in terms of strobe position in the turbid waters of some of the environments I was forced to shoot. An image that might look awesome in an e-mail and excellent in a magazine--and even stellar on the wall--could be an embarrassment at that level of magnification. Bringing the very best image to the computer, and then processing with all the tools technology provides was the only way to deliver the goods this time.
November 2006
Text and Photography by Stephen Frink
I recently had an assignment to create some very large murals, images for the new Florida Keys National Marine Sanctuary Visitor Center. In the initial e-mails with the designer, I was told they require 650MB files. Clearly this was a typo, I assumed. I shoot a Canon EOS-1Ds MKII, the reigning champion in the megapixel race (at least for cameras that can be used underwater, and therefore not counting medium-format cameras with digital backs or 4x5 film cameras), and this camera can hit the 65MB size with only slight interpolating (the normal file processed to eight-bit TIFF from RAW is around 49MB). But 10 times that? 650MB? No way!
Yet, that is truly what the designer meant. These murals were to be enlarged to 16 feet wide, and the traffic flow at the exhibit meant that visitors could walk right up to the prints. This was not like a billboard, which has to be only sharp enough to view from 500 yards away at 60 miles per hour. These murals had to be sharp enough to look good three feet away. Quite a challenge for our existing technology.
Before the project could go forward, I had to submit a digital file for a sample enlargement. Amazingly, the clients were quite happy. It seems their photographers for similar projects had been submitting medium- and large-format slides, and the fact that these digital files were competitive in terms of quality speaks volumes about the potential of digital capture vs. scanned film. But it also suggested that I had to get the absolute best quality from my digital images.
The whole project became an interesting exercise for me, as too often I find myself rushing through a dive from subject to subject, blissfully blasting away, knowing that I can always delete later. Or better yet, "fix it in post." Given the power of Photoshop software, too many marginal images are clogging my hard drives, as I think that one of these days I'll go back and make something of them. Why not do everything possible to get it right the first time? For this project, I had no choice.
Rule 1
Exposure Rules, Histograms Rock
While digital photography is fairly forgiving in terms of exposure, significant overexposure means that the detail is gone and nothing will bring it back. As a result, many shooters err on the side of underexposure. Fortunately, we have a very easy way to evaluate an image immediately after it is taken, simply by examining the histogram on the camera's LCD screen. Ideally arrayed as a Gaussian curve, too many pixels spilling off to the right probably means overexposure, and heavy distribution of data on the far left may mean underexposure. Yet, underexposure can be a massive issue as well, for significant and uncorrectable digital noise can result.
Here's an example. I was diving the Town Pier in Bonaire and saw a cooperative turtle make a quick fly-by of the orange cup corals cloaking the pilings. Recognizing this as a significant photo-op, I shot as quickly as my strobes would fire, capturing one of my favorite images.
Yet there were others from the series that suffered from underexposure because I was shooting before my strobe recycled in an effort to capture a specific composition. I liked the posture and expression of the turtle in the underexposed shot, but look at the histogram (image #3) as revealed in the Photoshop RAW template. All the data is skewed far to the left, indicating significant underexposure. Could I fix it in Photoshop? Maybe.
After adjustments, the histogram looked better and the subject was more dynamic. For a small print, say 11x14, or display on the web, I'd say salvation was achieved. But, for a 16-foot mural, massive noise and other digital artifacts would be obvious. Look at the detail, or lack thereof, at the Actual Pixels (100%) view (image #2).
Far greater quality could be extracted from the image with the better distribution of pixels across the histogram. So, Rule No. 1: Get the data, all the data, on the card to begin with.
Rule 2
Do Everything Possible While In RAW
Of course this assumes your digital images are being captured in RAW to begin with, but the advantages to this workflow protocol are so apparent it almost doesn't bear mentioning. It records all the data from the camera's computer, without the in-camera compression that happens with JPG, and once the Photoshop Camera RAW dialog box opens, massive controls are available to the shooter.
On the next page is an image that would have been very problematic if I had not captured it in RAW. I had been shooting some interiors the day before, and set my camera's white balance to "fluorescent," which made for some pretty funky colors when I shot this queen angelfish with the same 3,000-degree Kelvin white-balance setting.
With just a couple of slider controls I changed the white balance setting to 5,100 degrees Kelvin (custom daylight) and filled in some of the shadows.
All of which made for very easy final tweaks to the final image once I did open it in Photoshop. Some simple levels adjustments, a little color balance correction, and then all that remained was some healing-brush work for small bits of backscatter. Not only was it much easier and quicker doing all the heavy-lifting in the RAW format, the corrections I made were essentially those that would have been done if the camera was set for the correct white balance to begin with. That power is just too meaningful to ignore.
Rule 3
Work in 16-bit, Save to 8-bit
While the whole theory of bit depth is beyond my space allotment (not to mention my knowledge), the RAW protocol box offers the option of opening an image in 16-bit or 8-bit. Always open in 16-bit. That allows all the data there is to be used in whatever adjustments need to be accomplished. Once all corrections are done in 16-bit, there is very little advantage to saving at that bit depth. The file is twice as big as an 8-bit file, occupying twice as much space in an archive, for no significant enhancement. My mantra: Work in 16, save to 8.
Rule 4
Light Right
This mural project taught me another lesson--slow down and pay attention to strobe placement. The first image the clients selected, which had visible backscatter, taught me that lesson. After I spent an hour cloning white spots that would be the size of softballs in a 16-foot enlargement, it occurred to me that I should be ultra-careful in terms of strobe position in the turbid waters of some of the environments I was forced to shoot. An image that might look awesome in an e-mail and excellent in a magazine--and even stellar on the wall--could be an embarrassment at that level of magnification. Bringing the very best image to the computer, and then processing with all the tools technology provides was the only way to deliver the goods this time.