The Art of Shipwreck Photography
||
|---|
|  |
|
Since we in the Florida Keys are in the final stages of a project to sink the 510-foot Spiegel Grove in Key Largo to serve as an artificial reef, I'm reminded not only of the fascination shipwrecks provide recreational scuba divers, but also of their compelling attraction for underwater photographers. What follows is an overview of some of the reasons wrecks provide such awesome photographic potential, as well as some of the technical challenges that must be overcome to bring home the hot shots.
Why Photograph Shipwrecks?
History. Wrecks provide a revealing glimpse into our maritime past, whether it's an historical shipwreck (sunk through the normal course of war or seafaring commerce), or a modern artificial reef (sunk purposely to provide a dive attraction), a coastal freighter or a massive military vessel. Knowledge of the ship's past makes for a more interesting dive, and can also help prepare the photographer to find the significant vignettes--the photo opportunities that tell the story of the wreck.
Fish aggregations. Additionally, shipwrecks serve as terrific fish aggregating devices. The anecdotal evidence seems to suggest that fish often prefer shipwrecks to natural reefs. Wrecks also provide a substrate for the colonization of corals and colorful sponges, so the photographic backgrounds can be colorful and rich in both form and texture. Plus, marine creatures that live on shipwrecks seem reluctant to leave the protection of the wreck, making them more tolerant of photographic intrusion and easier to capture on film.
Technical Challenges
Depth. Some areas, like Bikini Atoll, provide a rich portfolio of shipwrecks but at depths so great that mixed gas and technical training are necessary for adequate and safe bottom time. But even in the realm of recreational dives on air or nitrox, the best shipwrecks are fairly deep. If they sank in very shallow water, they have probably broken apart over the years due to storm surge, or have been blown apart because they provided a hazard to navigation, leaving the most interesting and accessible wrecks in the 50- to 120-foot depth range. Plus, most wrecks require a square profile, unlike wall dives where a diver can continually work up a vertical face and spend time offgassing in the shallows. An underwater photographer needs to be prepared to work quickly and efficiently to make best use of the limited bottom time.
Visibility. Unfortunately, shipwrecks are not always found in crystalline waters to begin with, and they often accumulate layers of silt that can degrade visibility instantly. Knowing how to capture stunning photographs in turbid water is an essential tool in the shipwreck shooter's arsenal.
Overhead environments. It's not only the silt on the deck that becomes problematic, but also overhead sediment that rains down with every exhalation bubble while you work inside the wheelhouse or interior compartment. The best shipwreck photographers are those who can predict the effect their motions and breathing will have on the environment, then react instantly. Wreck penetrations can be dangerous. Trying to squeeze those last few shots out of a 36-exposure roll while navigating an uncertain exit from some obscure interior passageway while the tank pressure dwindles below 500 psi is absolutely not worth the risk.
The Tools
The Right Strobe. While the available-light wide shot is probably necessary to show the wreck overview, most of the vignettes of marine life and diver portraits will be done with strobe.
The three things I require of a strobe for shipwreck photography are (a) quick recycle time because we are working at depth and trying to stay ahead of the turbidity generated by other divers and ourselves; (b) wide-angle coverage; and (c) a model light.
While it may be possible to affix some sort of dive light to the camera rig, I have always found that a built-in model light is helpful to make sure the strobe is aimed correctly and to illuminate interior portions of the wreck. I happen to like the high-end Ikelite strobes for this purpose. The Ikelite 200 is my personal favorite for shipwreck photography because it has a nicad pack for fast recycle; a wide angle of coverage, particularly when a diffuser is added; and a model light bright enough to function as a primary light. (Note: Penetrations require redundant lights and wreck lines.)
Wide-Angle Lens. Much of the shipwreck story is wide-angle: schools of fish, massive propellers, expansive companionways, sponge-draped wheelhouses. The Nikonos with the 15mm lens at 94 degrees is an excellent tool, as is the Sea & Sea 15mm version or, perhaps even better, Sea & Sea's 12mm ultra-wide. Housed cameras with dome ports accommodate fixed focal length wide-angles like the 18 or 20mm lenses, or even full frame fisheyes such as the 16mm. If I had to cover a shipwreck on a single dive with just a single camera and a single lens, I'd choose a housing with one of the new 17-35mm zoom lenses (available from either Canon or Nikon). Then I could cover the overall shape and structure of the wreck, plus crop into smaller subjects like resident marine life or diver/artifact portraits.
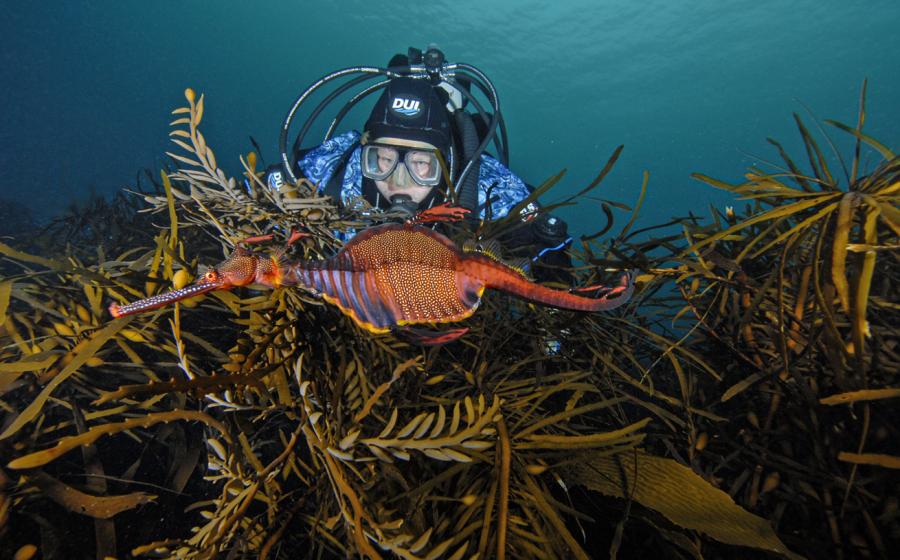
A Model. A talented dive model can add great impact to shipwreck photos. A diver in the frame provides scale: What good is photographing a propeller 20 feet in diameter without some size reference to illustrate the sheer mass? Attractive dive apparel can add color to an otherwise monochromatic scene, and with a model's eye contact and hand-held dive light, the viewer's eye can be directed to some interesting element on the wreck.
Shipwreck Shoot: Step-by-Step Guide
||
|---|
|  |
|
Let's say there's a new shipwreck to photograph and only one dive to do it. How should you prepare and execute?
Step One: Research. Ask a local divemaster to describe the vessel in terms of depth, how she lies on the bottom, and where the interesting photo opportunities might be. Are there resident schools of fish, and if so, where? Are there any big critters like Goliath groupers, eels or barracuda commonly found lurking in a predictable spot? Are there propellers or artifacts that you should try to capture? Ideally, the divemaster would draw a sketch of the wreck and you would plot a hit list, starting from the deepest portion of the wreck and working upward and forward to the mooring line.
Step Two: Catch the available-light shot. Capture a few available-light wide-angle shots of the wreck on the way down, ideally with another diver in the frame. Generally, shoot these at about 1/30th or 1/15th second at f-4 or f-5.6 with ISO 50 film (depending on depth and light penetration) with the lens set at infinity. If the visibility is good, you may be able to capture the bow and the wheelhouse in the same frame.
Step Three: Go for the deep shot. For an upright ship like the Duane in Key Largo, the deep shot might be the propellers. For a ship on her side like the Hilma Hooker in Bonaire, it could be the crow's nest. Control your breathing, set your camera and strobe, and then gently settle into the sand bottom and avoid stirring up any sediment. Then, bring your model into position on the opposite side of the wreck artifact and shoot very quickly. With many of these set-ups, you'll only get a few shots before depth considerations or backscatter forces you to abandon the scene, so be fast and efficient. This is no time to be fumbling with f-stops or struggling with strobe arms.
Step Four: Go for the important interiors. Unless you are lucky enough to be on your own private dive boat, there will be other divers who may not share your passion for photography or your buoyancy skills. If they arrive at the wheelhouse or engine room first, a clumsy fin stroke or some errant bubbles can quickly render the scene too dirty for a decent shot. Think about what you need to cover photographically and try to get there early in the dive. And if your dive light reveals too much particulate matter in suspension, don't hesitate: Move on to some more productive portion of the wreck.
Step Five: Capture the marine life. This is likely a wide-angle shot, but may also be done with a normal lens. I usually figure a tight head shot of a fish like a blue-striped grunt is easier to do on a shallow reef, so I tend to concentrate on environmental portraits of the fish. But if there are fish that are unique to that particular wreck, then of course a more intimate fish portrait composition may be called for.
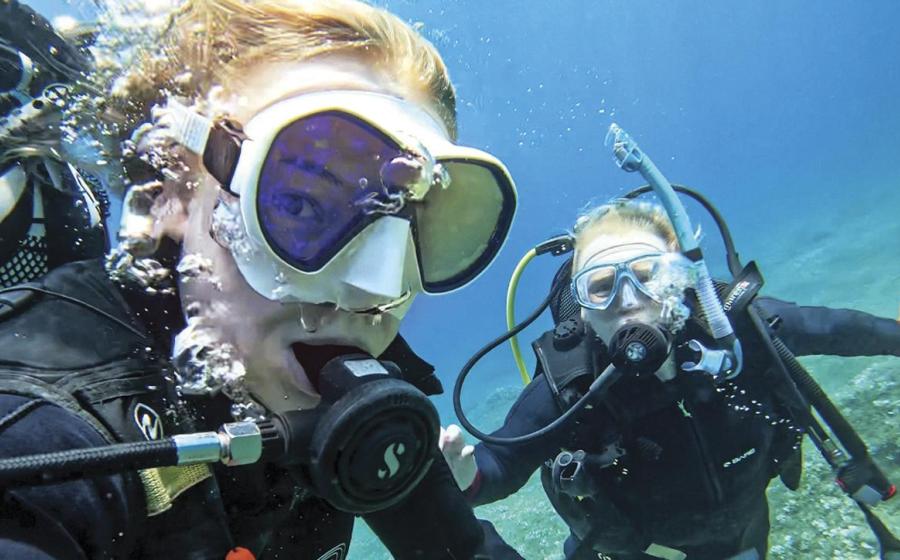
Step Six: Record the diver portrait. There may be artifacts like deck winches, doorways, hatches or portholes that can provide wonderful foregrounds for diver portraits. Work with an underwater model who knows your hand signals.
Step Seven: Watch for the pelagics. As you begin your ascent, keep an eye out for fish that work the periphery of the wreck. There may be schools of amberjack or barracuda, or even large pelagics like mantas or whale sharks swimming by the wreck. However, caution is necessary. By the time you're ascending, you will probably be low on air and restricted on bottom time. This is not the time to head out in the blue to chase critters, only to find yourself down-current, out of air, and still needing five minutes of decompression.
|| |---|
||
Since we in the Florida Keys are in the final stages of a project to sink the 510-foot Spiegel Grove in Key Largo to serve as an artificial reef, I'm reminded not only of the fascination shipwrecks provide recreational scuba divers, but also of their compelling attraction for underwater photographers. What follows is an overview of some of the reasons wrecks provide such awesome photographic potential, as well as some of the technical challenges that must be overcome to bring home the hot shots.
Why Photograph Shipwrecks?
History. Wrecks provide a revealing glimpse into our maritime past, whether it's an historical shipwreck (sunk through the normal course of war or seafaring commerce), or a modern artificial reef (sunk purposely to provide a dive attraction), a coastal freighter or a massive military vessel. Knowledge of the ship's past makes for a more interesting dive, and can also help prepare the photographer to find the significant vignettes--the photo opportunities that tell the story of the wreck.
Fish aggregations. Additionally, shipwrecks serve as terrific fish aggregating devices. The anecdotal evidence seems to suggest that fish often prefer shipwrecks to natural reefs. Wrecks also provide a substrate for the colonization of corals and colorful sponges, so the photographic backgrounds can be colorful and rich in both form and texture. Plus, marine creatures that live on shipwrecks seem reluctant to leave the protection of the wreck, making them more tolerant of photographic intrusion and easier to capture on film.
Technical Challenges
Depth. Some areas, like Bikini Atoll, provide a rich portfolio of shipwrecks but at depths so great that mixed gas and technical training are necessary for adequate and safe bottom time. But even in the realm of recreational dives on air or nitrox, the best shipwrecks are fairly deep. If they sank in very shallow water, they have probably broken apart over the years due to storm surge, or have been blown apart because they provided a hazard to navigation, leaving the most interesting and accessible wrecks in the 50- to 120-foot depth range. Plus, most wrecks require a square profile, unlike wall dives where a diver can continually work up a vertical face and spend time offgassing in the shallows. An underwater photographer needs to be prepared to work quickly and efficiently to make best use of the limited bottom time.
Visibility. Unfortunately, shipwrecks are not always found in crystalline waters to begin with, and they often accumulate layers of silt that can degrade visibility instantly. Knowing how to capture stunning photographs in turbid water is an essential tool in the shipwreck shooter's arsenal.
Overhead environments. It's not only the silt on the deck that becomes problematic, but also overhead sediment that rains down with every exhalation bubble while you work inside the wheelhouse or interior compartment. The best shipwreck photographers are those who can predict the effect their motions and breathing will have on the environment, then react instantly. Wreck penetrations can be dangerous. Trying to squeeze those last few shots out of a 36-exposure roll while navigating an uncertain exit from some obscure interior passageway while the tank pressure dwindles below 500 psi is absolutely not worth the risk.
The Tools
The Right Strobe. While the available-light wide shot is probably necessary to show the wreck overview, most of the vignettes of marine life and diver portraits will be done with strobe.
The three things I require of a strobe for shipwreck photography are (a) quick recycle time because we are working at depth and trying to stay ahead of the turbidity generated by other divers and ourselves; (b) wide-angle coverage; and (c) a model light.
While it may be possible to affix some sort of dive light to the camera rig, I have always found that a built-in model light is helpful to make sure the strobe is aimed correctly and to illuminate interior portions of the wreck. I happen to like the high-end Ikelite strobes for this purpose. The Ikelite 200 is my personal favorite for shipwreck photography because it has a nicad pack for fast recycle; a wide angle of coverage, particularly when a diffuser is added; and a model light bright enough to function as a primary light. (Note: Penetrations require redundant lights and wreck lines.)
Wide-Angle Lens. Much of the shipwreck story is wide-angle: schools of fish, massive propellers, expansive companionways, sponge-draped wheelhouses. The Nikonos with the 15mm lens at 94 degrees is an excellent tool, as is the Sea & Sea 15mm version or, perhaps even better, Sea & Sea's 12mm ultra-wide. Housed cameras with dome ports accommodate fixed focal length wide-angles like the 18 or 20mm lenses, or even full frame fisheyes such as the 16mm. If I had to cover a shipwreck on a single dive with just a single camera and a single lens, I'd choose a housing with one of the new 17-35mm zoom lenses (available from either Canon or Nikon). Then I could cover the overall shape and structure of the wreck, plus crop into smaller subjects like resident marine life or diver/artifact portraits.
A Model. A talented dive model can add great impact to shipwreck photos. A diver in the frame provides scale: What good is photographing a propeller 20 feet in diameter without some size reference to illustrate the sheer mass? Attractive dive apparel can add color to an otherwise monochromatic scene, and with a model's eye contact and hand-held dive light, the viewer's eye can be directed to some interesting element on the wreck.
Shipwreck Shoot: Step-by-Step Guide
|| |---|
||
Let's say there's a new shipwreck to photograph and only one dive to do it. How should you prepare and execute?
Step One: Research. Ask a local divemaster to describe the vessel in terms of depth, how she lies on the bottom, and where the interesting photo opportunities might be. Are there resident schools of fish, and if so, where? Are there any big critters like Goliath groupers, eels or barracuda commonly found lurking in a predictable spot? Are there propellers or artifacts that you should try to capture? Ideally, the divemaster would draw a sketch of the wreck and you would plot a hit list, starting from the deepest portion of the wreck and working upward and forward to the mooring line.
Step Two: Catch the available-light shot. Capture a few available-light wide-angle shots of the wreck on the way down, ideally with another diver in the frame. Generally, shoot these at about 1/30th or 1/15th second at f-4 or f-5.6 with ISO 50 film (depending on depth and light penetration) with the lens set at infinity. If the visibility is good, you may be able to capture the bow and the wheelhouse in the same frame.
Step Three: Go for the deep shot. For an upright ship like the Duane in Key Largo, the deep shot might be the propellers. For a ship on her side like the Hilma Hooker in Bonaire, it could be the crow's nest. Control your breathing, set your camera and strobe, and then gently settle into the sand bottom and avoid stirring up any sediment. Then, bring your model into position on the opposite side of the wreck artifact and shoot very quickly. With many of these set-ups, you'll only get a few shots before depth considerations or backscatter forces you to abandon the scene, so be fast and efficient. This is no time to be fumbling with f-stops or struggling with strobe arms.
Step Four: Go for the important interiors. Unless you are lucky enough to be on your own private dive boat, there will be other divers who may not share your passion for photography or your buoyancy skills. If they arrive at the wheelhouse or engine room first, a clumsy fin stroke or some errant bubbles can quickly render the scene too dirty for a decent shot. Think about what you need to cover photographically and try to get there early in the dive. And if your dive light reveals too much particulate matter in suspension, don't hesitate: Move on to some more productive portion of the wreck.
Step Five: Capture the marine life. This is likely a wide-angle shot, but may also be done with a normal lens. I usually figure a tight head shot of a fish like a blue-striped grunt is easier to do on a shallow reef, so I tend to concentrate on environmental portraits of the fish. But if there are fish that are unique to that particular wreck, then of course a more intimate fish portrait composition may be called for.
Step Six: Record the diver portrait. There may be artifacts like deck winches, doorways, hatches or portholes that can provide wonderful foregrounds for diver portraits. Work with an underwater model who knows your hand signals.
Step Seven: Watch for the pelagics. As you begin your ascent, keep an eye out for fish that work the periphery of the wreck. There may be schools of amberjack or barracuda, or even large pelagics like mantas or whale sharks swimming by the wreck. However, caution is necessary. By the time you're ascending, you will probably be low on air and restricted on bottom time. This is not the time to head out in the blue to chase critters, only to find yourself down-current, out of air, and still needing five minutes of decompression.